
More InSoFast insulation. With LOTS of cuts to make things fit right. Remember? No exposed metal!
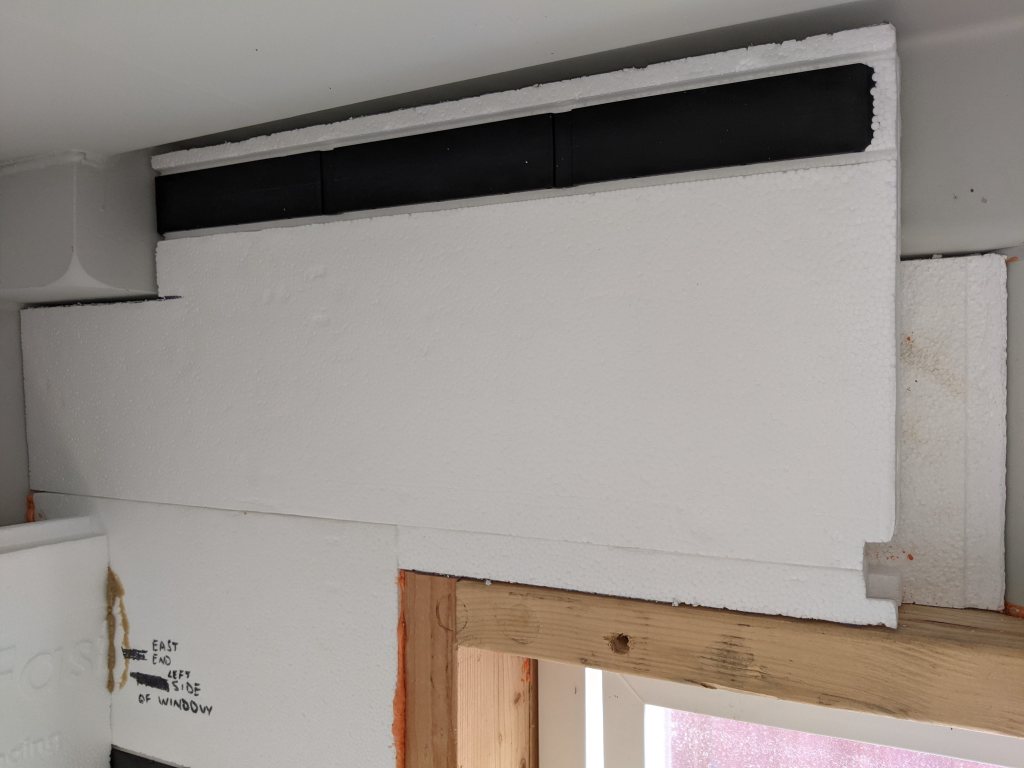
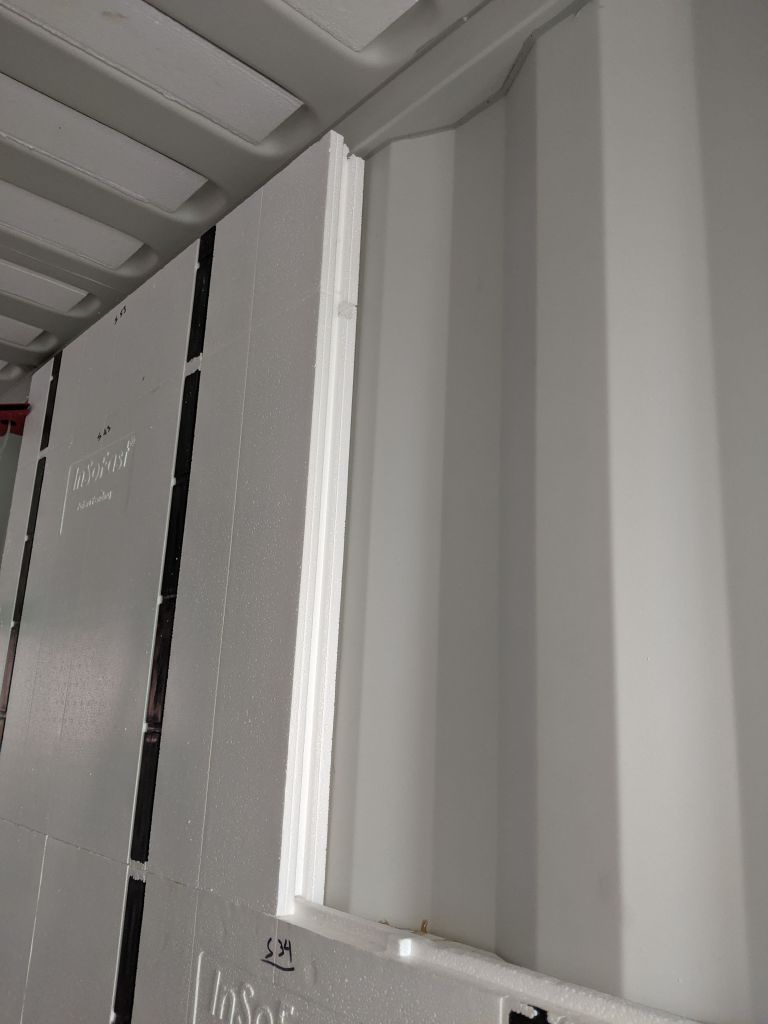
Back Wall is Finally Done
I was waiting until I was sure how and where we were going to route power conduit and water lines from the outside. Glad we did too. We stumbled onto a pretty neat way to make it all happen with the added capability of adding more home-runs, water and power (AC & DC) in the future. More on that in a future post, but trust me, it’s kinda cool.
And yes, we’ll have to build 3-sided end caps for those two exposed “chunks” of steel in the corners. You don’t dare screw or cut into them because they’re the corner boxes that are used for lifting and stacking. Just sequester them away and forget they were ever there.
The TOP Row
If you’ve ever watched any of Ed’s videos from InSoFast you’d only see him doing wall installations in containers that are 8 feet high. Never a high-cube, at 9.5 feet. That’s why you look so tall, Ed. You can touch the bloody ceiling!
This “fifth row” is only about 8-9″ tall and must incorporate notches for the top steel framing as well as cut-outs for the “U” hooks if you don’t remove them with a grinder first. What you don’t find out until much later is that if you don’t plan ahead for this last row, your options are very limited when you go to installing it.
So I gave Ed a call and he explained his solution, which was very close to what we had assumed. If you’ve already glued in the fourth row, the only way to get the fifth row in is to remove the fourth row’s tongue at the top and your ~8″ fifth row can slide in straight.
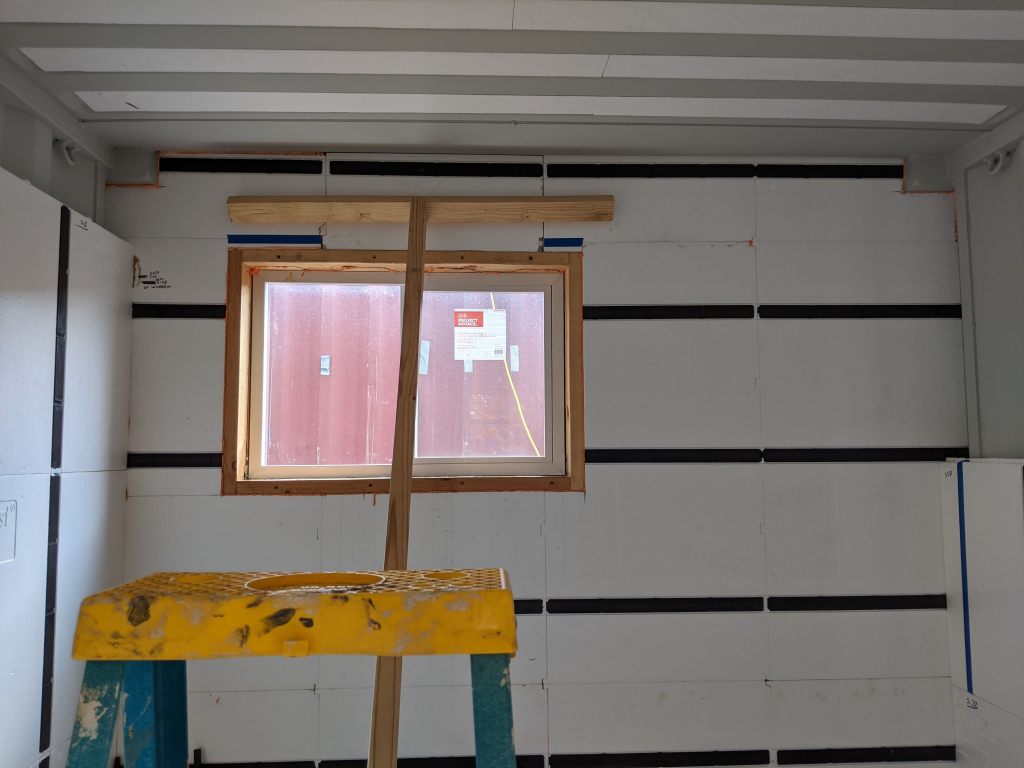
If, however, you haven’t set your fourth row in yet then you have a couple of options. As you can see by the previous pictures the North wall already has its fourth row glued in but the South wall does not. Here’s an opportunity to show you both solutions.
Solution 1 : The Fifth Row
First, climb your ladder and cut the tongue off the top of the fourth row with an Exacto knife. Don’t worry, you’re going to use enough LocTite on this row and the bottom of the fifth that it won’t be going anywhere. You’ll still have the option of using the brick pattern where the next row will alternate over the seams of the ones below like you’ve done up to this point.
Second, you’re going to want your fifth row to go high enough to provide support for your 2-inch thick ceiling panels that will go in last, so you’re going to need a notch. In other words, don’t cut your fifth row to go all the way to the ceiling. If you do, you’ll only get two pieces out of one full panel! Which is why I said it’s approximately 9″ for the top row. In reality it’s just less than 8″. A full panel is 24″ tall. 9″ doesn’t divide more than twice into 24″. TRUST ME! Even if you have a second set of hands, and a second ladder, to install your ceiling panels you’ll also want a little ledge of wall insulation to slide the ceiling panels onto. In doing so, there’s the added benefit to cutting your wall panels into thirds, each approximately 7 and 5/8″ in height.
Set your table saw and make enough of these for the wall that needs a fifth row. Cut beginning from the BOTTOM of the panel! If you do this right, you should only have about a quarter to half inch of waste on the final cut thru your saw. Once they’re cut, grab your traditional wood hand saw and notch the top of each as shown in the pictures. I’ve tried shorter saws, dry-wall saws, and even a carpet knife but the 2 to 3 foot wood hand saw with fine teeth, using a “dragging cut”, keeps your line straight and smooth.
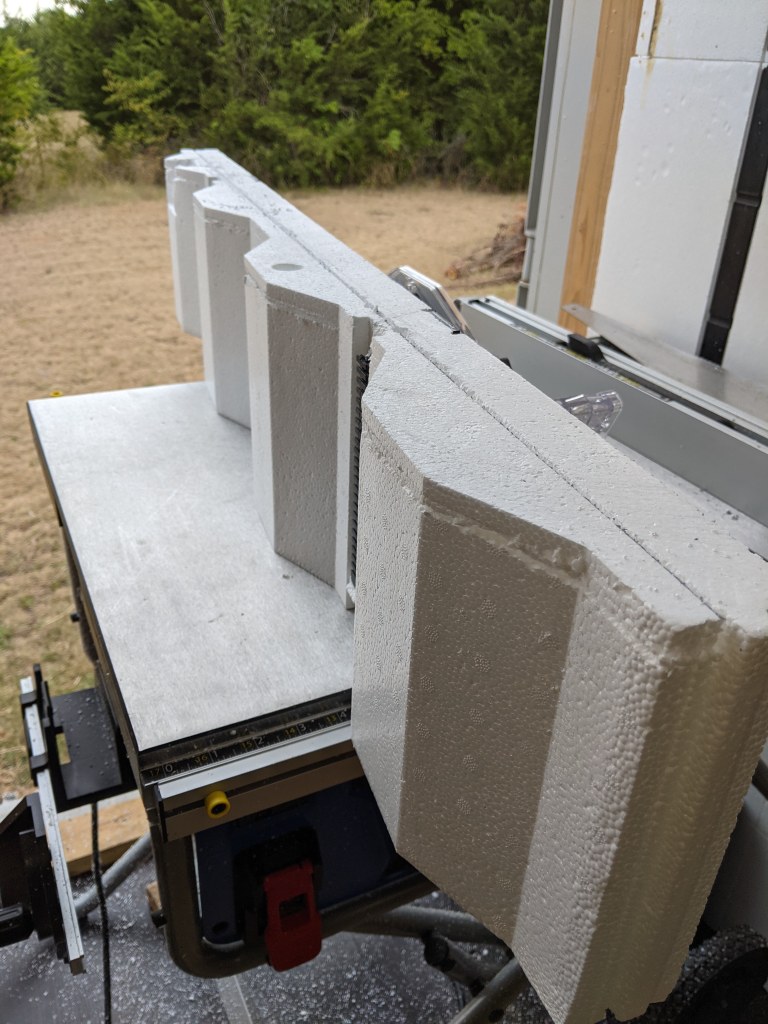
With a t-square draw a Sharpie line from the inside of the tongue on one side to the inside edge of the groove on the other. That’s all the depth you’ll need at the top. Ideally your notch won’t go any deeper than about three teeth on the black plastic Stud Comb (as I call it), so get out your side cutters or wire cutters and cut three teeth off the top. I’ve also found that alternating drag cuts, top and then back, will help as the piece(s) tend to just fall off once you’ve reached the right depth.

Apply LocTite, liberally but thinly, to the bottom, back AND the groove that will mate with the previous piece. Remember, you don’t have the bottom tongue to keep your fifth row secure anymore. A few dollops of LocTite on the groove will help. Additionally, you’ll want to try to slide them IN, to the previous panel’s vertical groove, and DOWN, on top of the fourth row, so you don’t scrape off the adhesive that’s on the bottom of your short fifth row panel.
NOTE: Make sure to install your fifth row so that your vertical cable-way holes aren’t blocked.
Solution 2 : The Fourth “Super” Row
This method works well if you haven’t installed your fourth row but it comes with some slight advantages and disadvantages:
- You won’t get to alternate your fifth row over your fourth, like a brick wall
- You won’t have to cut off the top tongue of the fourth row panel however
- Your vertical and horizontal pathways will still be aligned and unblocked for routing power/data lines
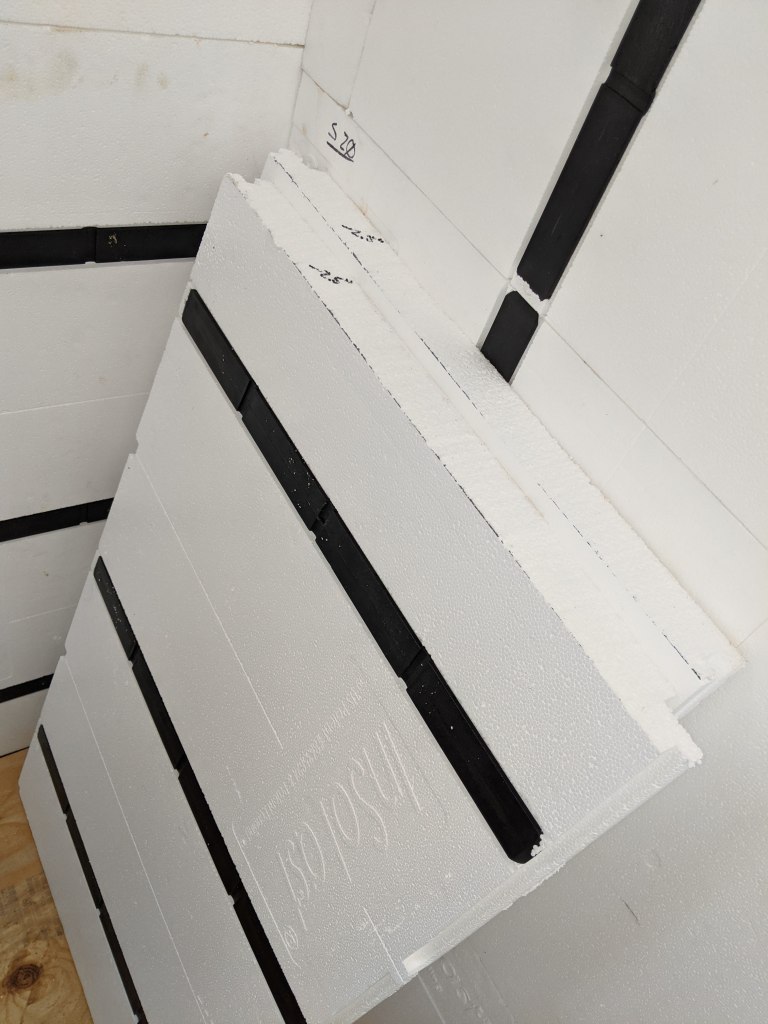
In short, you’re going to glue your short, notched, fifth row panel to the top of your fourth row panel before installing them together as one “Super” tall “Row”. Glue them together and wait until they’re dry. A few dollops of LocTite every few inches should work. Squeeze flat and scrap off the excess.
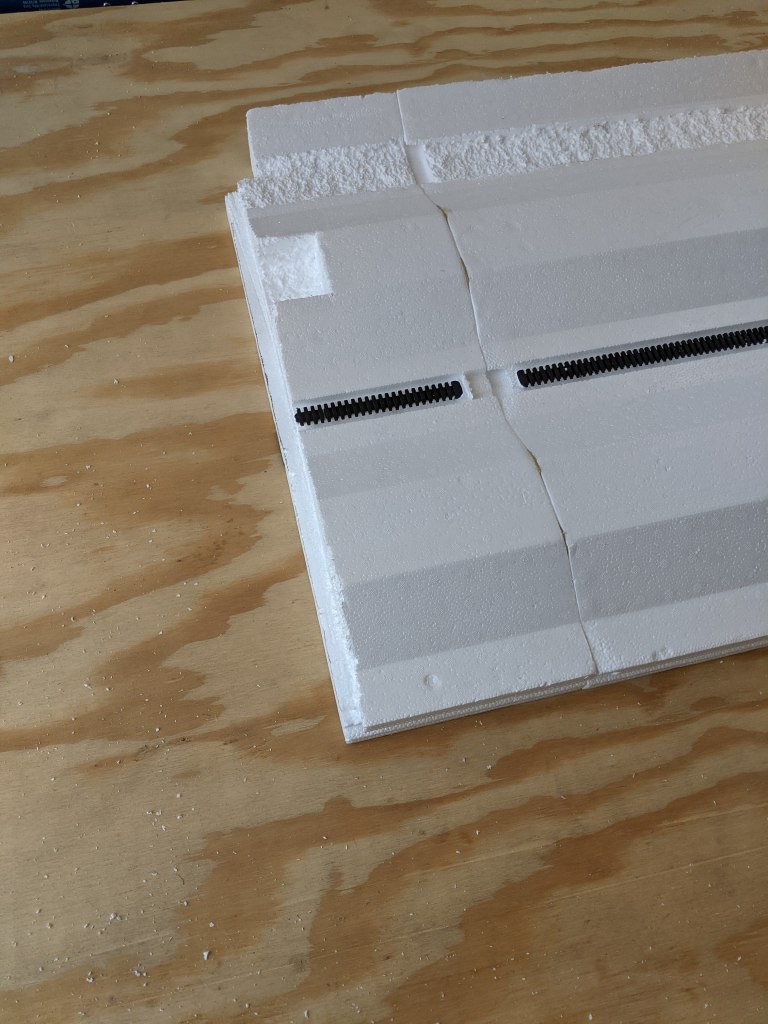
This Super-Block had the added benefits of being notched at the top right for that corner piece of steel we mentioned earlier in the post, a cut-out for the steel U-hook, and for those of you who know shipping containers, there’s a small outcropping in the corner assemblies that requires cutting a shallow channel to accommodate while keeping the panel from jutting out. See that strip of rough foam channel in the previous pic?
I’ve never done so much whittling of Styrofoam in my entire life. The stuff gets everywhere, so invest in a leaf blower to get it all out of the way and in a pile where a shop vac will be of better use.
NOTE: Don’t do this if you’re all sweaty or you’ll look like you’ve been bobbing for apples inside of a snow-globe.

AGAIN…Dry fit everything several times (together and to the wall) before gluing it all together. And wait until the next day for everything to harden before installing your “super” assembly against the wall. Why? Mostly because it’s easier to wedge a single panel assembly with one T-bar brace than it is to apply even pressure to a recently glued super panel that wants to flex in 5 or 6 different directions because its seams are still wet.

But don’t take my word for it. Go ahead. I’m willing to bet you’re not half as good as Steve Martin is at Folding Soup though. https://www.goodreads.com/book/show/883398.Cruel_Shoes
Installed Super Row 4
Installation is pretty much the same but we’ve found that when installing it’s actually a little easier to insert the panel into the vertical grooves of the panel next to it (starting at the bottom) and then down into the horizontal grooves of the panel below it. Imagine sliding them in South-Southeast, or South-Southwest.
Even Better: If you can do the entire row the whole length of the container at the same time, you can tilt out the previous panel slightly which makes it easier to install the next panel in the row. Ed, from InSoFast, always says to “push the panel against the wall to squish out the adhesive a little but then pull the panel away from the wall and repress it again.” This helps spread the adhesive more evenly while providing the right amount of “stand-off” the glue might need to create. Ed calls it a “liquid shim” that helps make a uniform and flat level behind each panel. I didn’t question his logic, I just did it. And I’ll be damned if there’s less bowing, visually, than there would be otherwise. And the bubble level doesn’t lie either.
Some for the North and some for the South. Our Cuts
Because I’d already finished our North wall, we were stuck with cutting off the 4th row tongue and required to cut full wall panels into thirds. The thing to note in our case, however, is that we could cut 7 and 5/8″ off the BOTTOM of a full panel and use that one piece for the South wall because it has a groove in it. Then we could use it in a Super Row configuration like described above. The next two cuts from the full panel would have flat bottoms (and tops_ which made them ideal for the North wall, with no tongue and groove necessary. Hope that makes sense.
If We Had to Do it Again
And we will in future installations. Still using the Super-Row concept, the easiest solution is to alternate flat bottom cuts with those that have a bottom groove. In theory, this will re-enforce the lack of a tongue and groove giving us a little more strength on every other “fifth row” piece.
A slightly harder solution is to whittle out a groove on the bottom of your two flat bottom piece cuts so you have a tongue and groove working again. But again, you’re still stuck with doing a Super Row where you’re preassembling a 4th and 5th row before mounting on the wall which eliminates the ability to do a brick pattern.
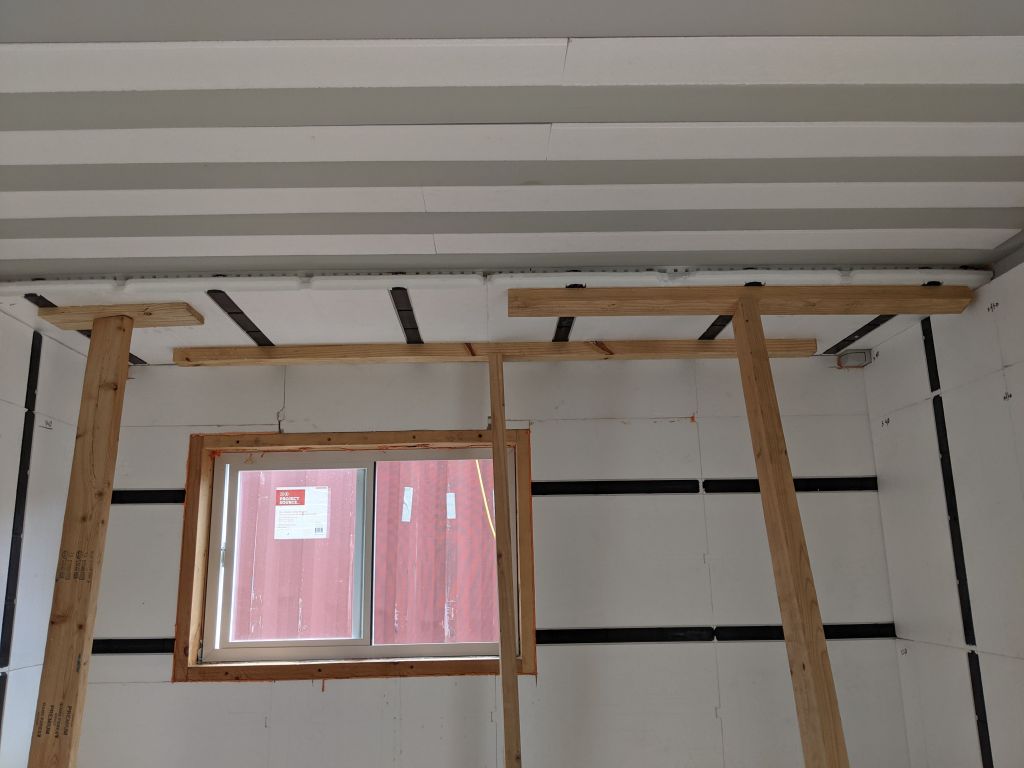
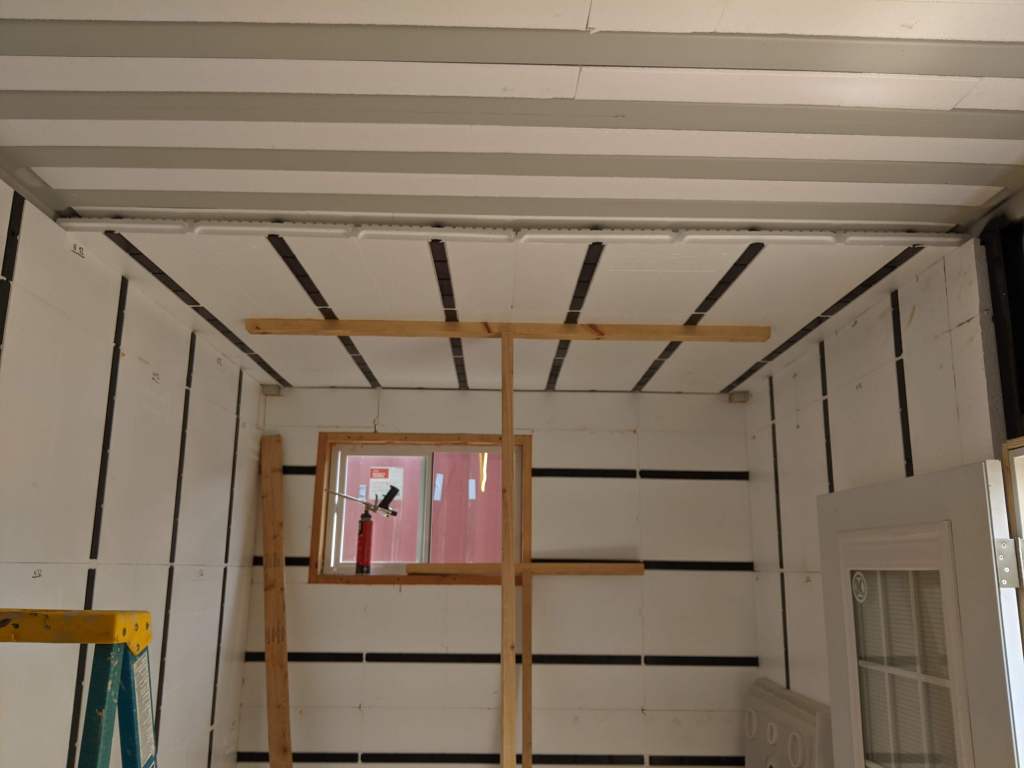
The Ceiling
A few good Lessons Learned here too:
- Your ceiling panels are 4 feet in length but the inside dimensions aren’t exactly 8 feet so you’re going to need to cut off a little
- Your first “row” will only have support on the container’s sides so more support braces are needed in the beginning
- Don’t glue in a ceiling panel without the next row dry-fit after it… You’ll See.
Measure Once Cut Twice
As you can see in the image we thought cutting 2.5 inches off the left of one panel and the right of another would do the trick. Oops, we forgot that these are not only going to be really tight but they’re going into a corner at the ceiling. And in a shipping container, where there’s a corner, there’s a weld bead. Need to make room for both.
Solution: Measure 2 and 5/8ths inches for your cuts. And when cutting with your wood handsaw don’t cut perfectly perpendicular. Cut with a slight angle inward to accommodate for a slight gap between the back of your panel and the weld bead on the ceiling. You don’t need much. Just enough that makes the back of your panel on the ceiling slightly shorter than the front of the panel.
Looks great, don’t you think?
Think again. While it looks like you’ve got your bases covered with enough pressure to hold your first row in place, what you missed is there’s too much pressure and this is compressing the panel too much. Yep, you guessed it, now the tongue of this row won’t align with the next row you try to install later or tomorrow. More whittling to make it fit…
Ideally, you’d have enough T-braces to do the whole container or at least several of these rows but even then you still have to worry about the last row you’re going to build off tomorrow.
Solution: Before putting your full-court press on the newly glued panel install another row that’s only dry-fitted into place. Then kick your t-brace so your glued row presses up nicely across the whole ceiling. Not too close to the next row’s edge though. Your dry fit panel will keep the spacing right so that your tongues and grooves will align nicely later (or tomorrow). Don’t forget your, orange (or whatever), cracks and gaps sealant spray foam at every seam before installing each row, just like you did on your walls. This will keep any moisture-laden air from reaching bare metal!
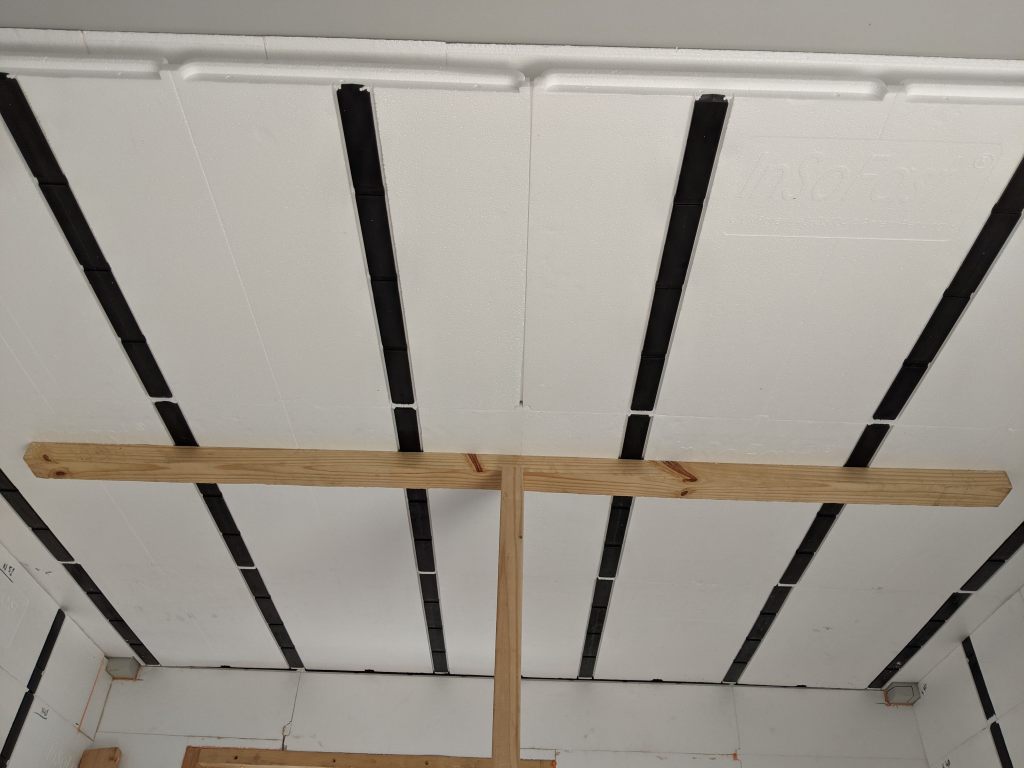
The other good news is that because the previous row is dry and the ends are supported by your wall “Fifth Row”, however you did it, you only need one T-brace to hold things evenly against the roof while things cure.
NOTE: most shipping containers bow upward in the middle to aid in drainage of rain water. By using a T-brace aligned dead center you’ll be able to match that bow because the outer edges of your “T” will slant downward slightly.
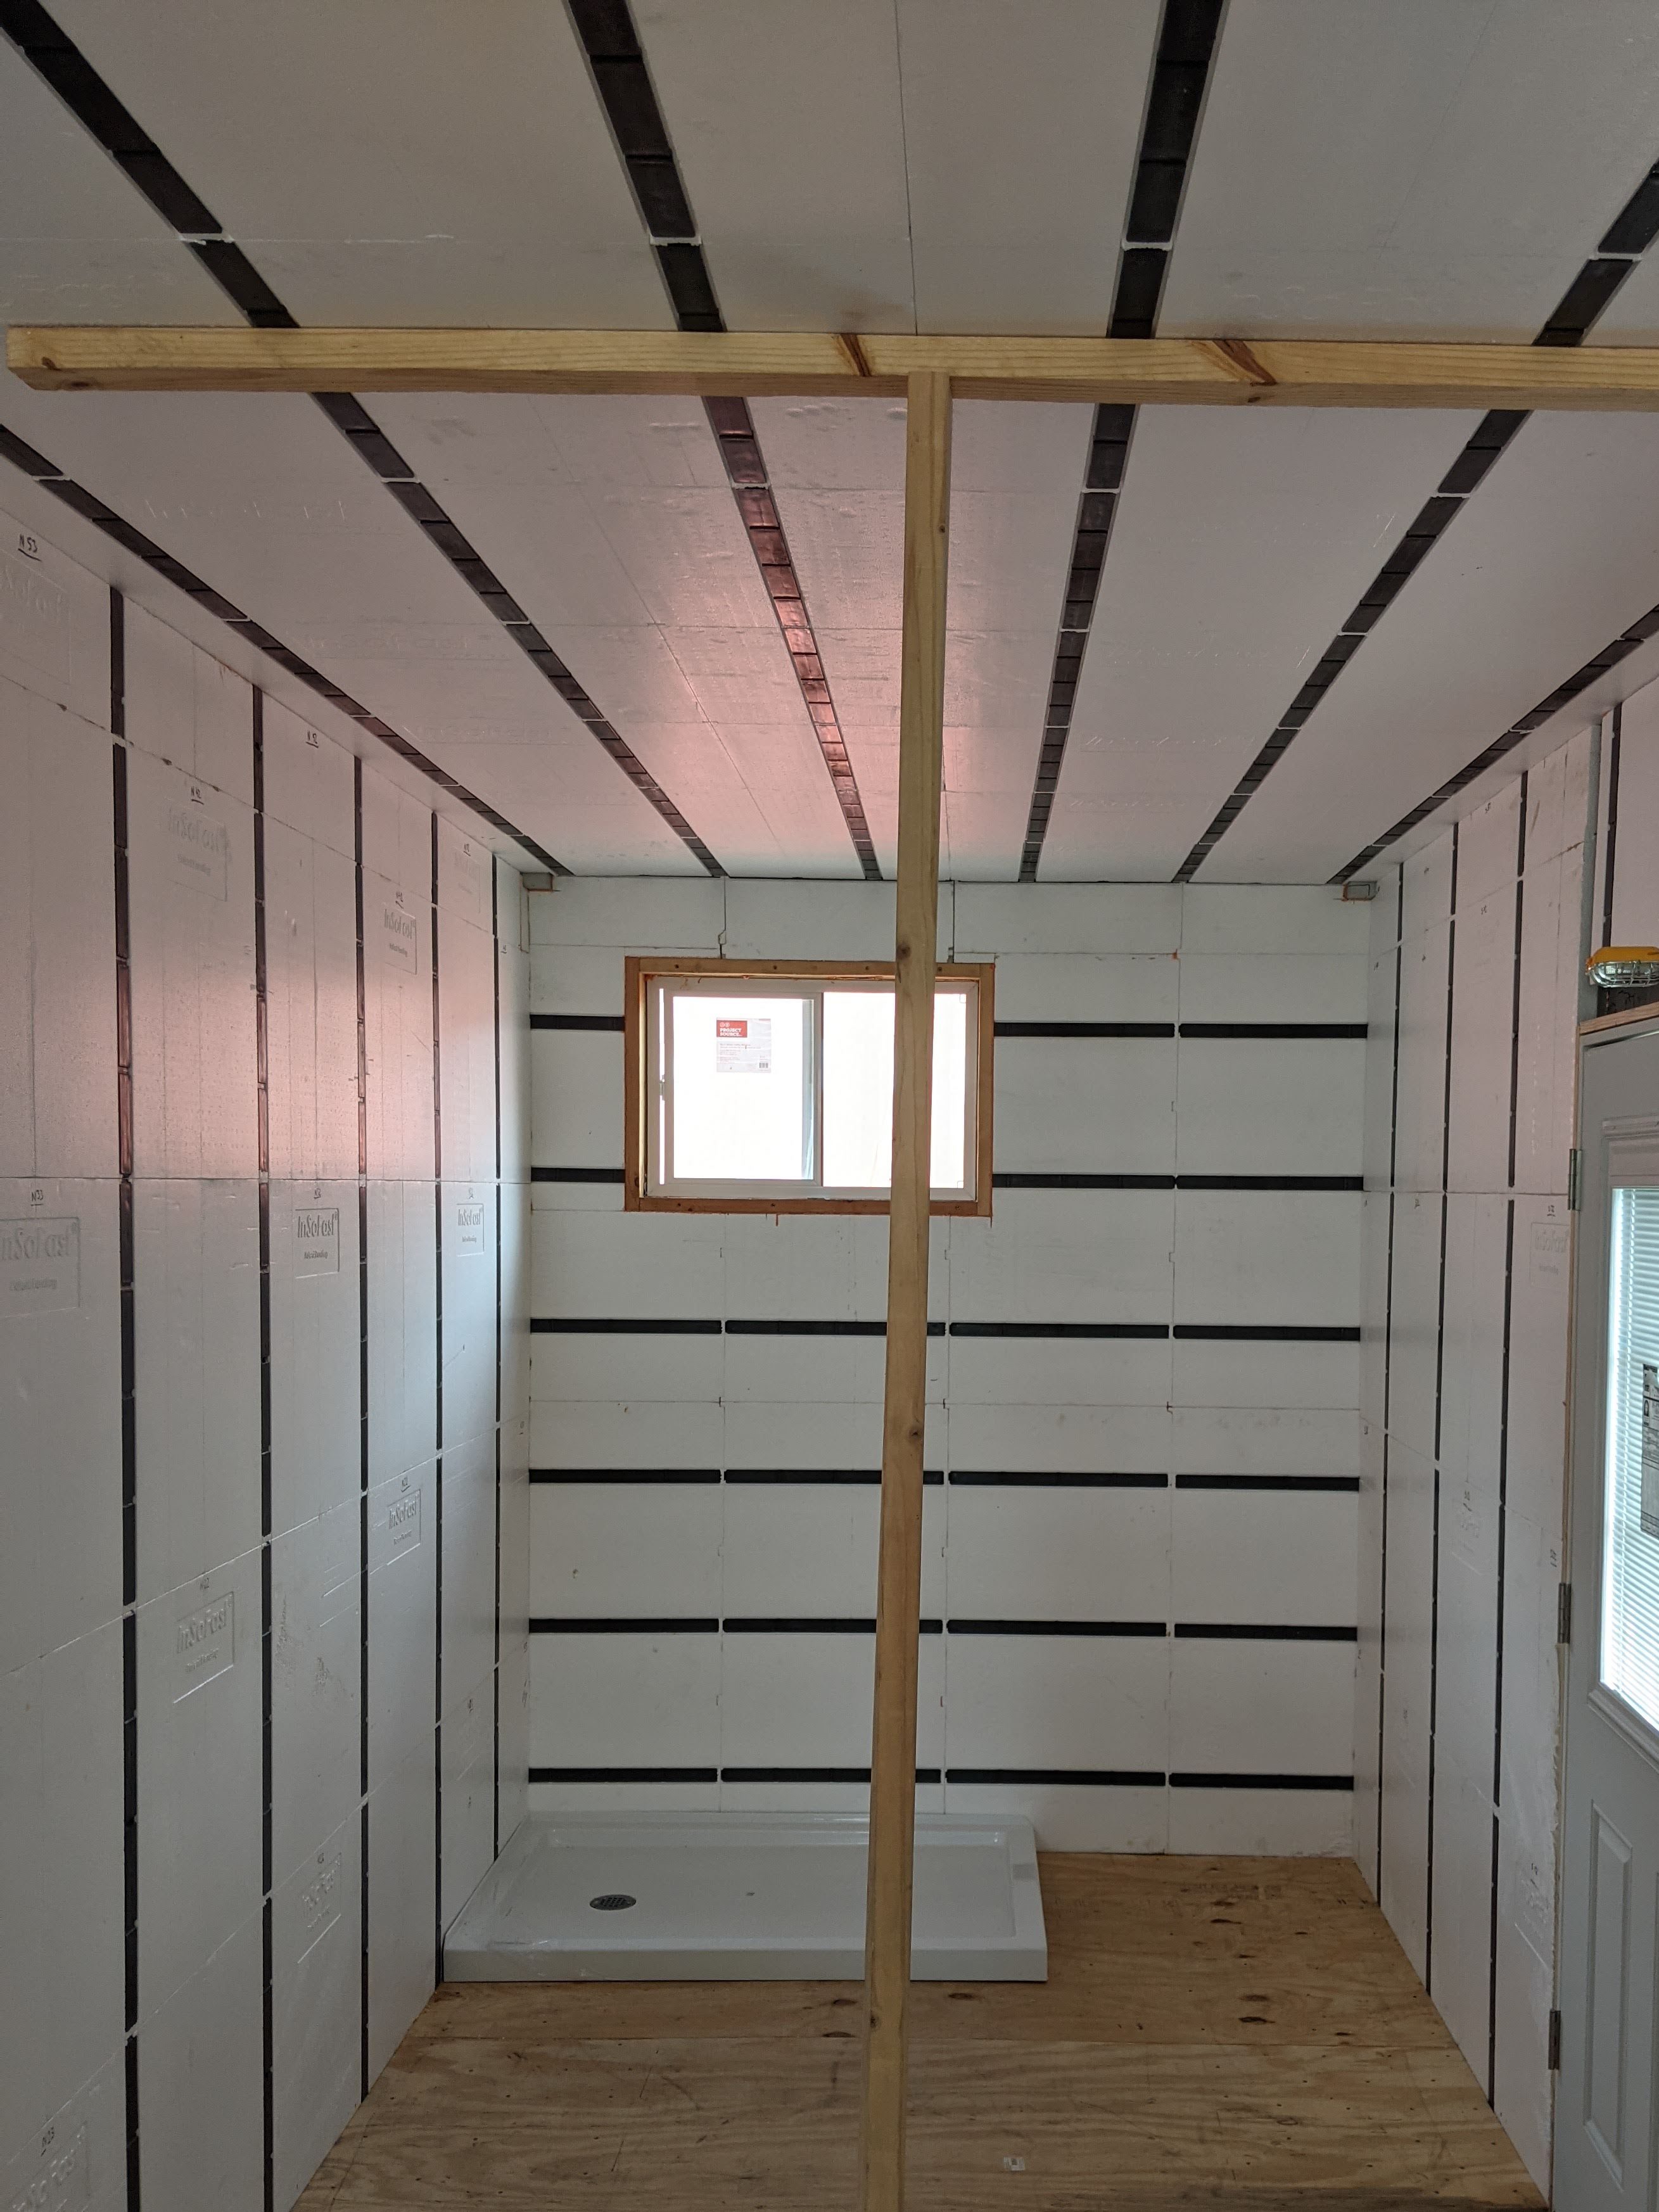
See how there’s no glue in that last row but it’s still hanging up there pretty well? This shows how much inherent support is already there in the previous row and sides even before you add adhesive.
A few more days later and voila.
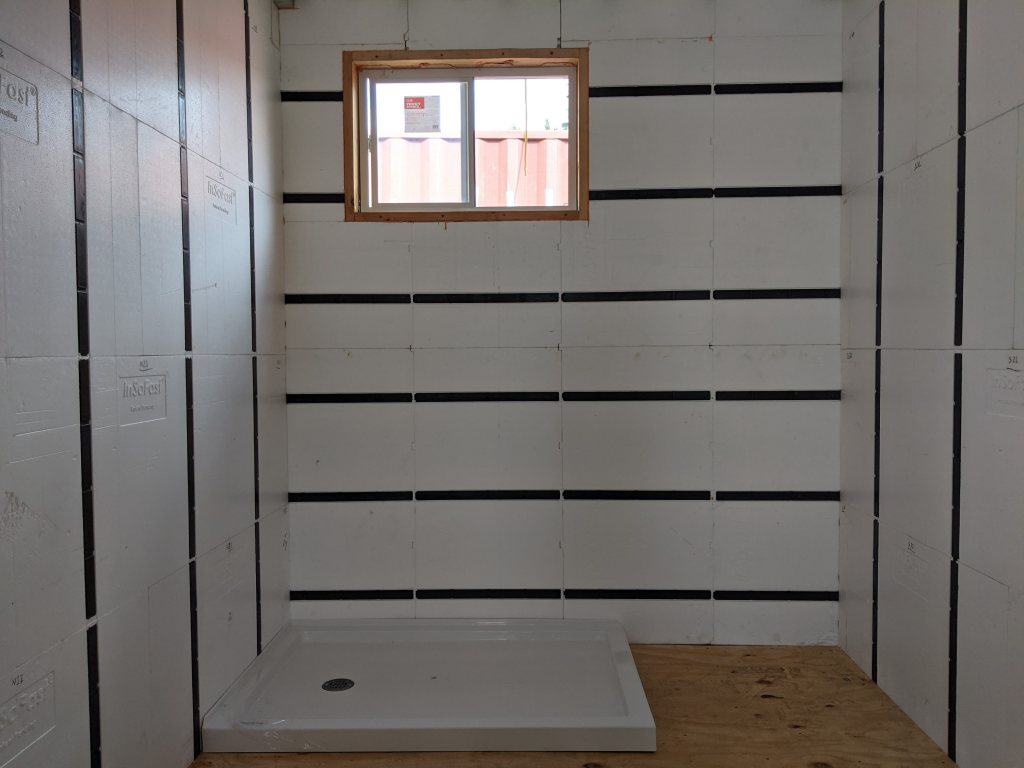
We even had the chance to see how the shower pan will look.
Rinse and Repeat…See y’all next month when we start on the bathroom walls and fixtures. Finally!
